Headspace in Canning: What It Is and Why It Matters
What is headspace in canning? Headspace refers to the empty area left between the top of the jar’s contents and the inside of the lid. Properly measured headspace allows for an airtight seal when canned goods are processed properly, which prevents spoilage and contamination by bacteria. Too much, or too little headspace may affect the safety, shelf life, and quality of your food, so you want to get it just right!
Headspace is one of the most important factors in canning, but it’s also one of the most misunderstood.
Many people don’t know how much headspace they’re supposed to leave when canning food, and end up with jars that aren’t properly sealed or are unsafe to eat.
This guide takes you through all the ins-and-outs of headspace so that next time you’re canning, you’ll have a safe product that lasts for a long time.
What is headspace in canning and why it matters
It happens almost every time you can: you’re left with a bit of extra food that doesn’t fit perfectly into a jar (let’s say it’s applesauce). You could do one of three things:
a) Try to squeeze the extra applesauce into a jar making it very full;
b) Start a new jar and fill it only half full; or
c) Put the extra bit of applesauce into a container and store it in the fridge and eat within several days.
If you choose Option A, you would not have enough headspace. When this happens, you risk the chance of the food boiling over during processing. This results in food residue getting under the lid and preventing a proper seal which invites in bacteria or promotes mold growth. Or sometimes, the extra food spurts out making a huge mess.
Option B would leave you with too much headspace. This extra air at the top isn’t sufficiently released during processing. This results in an improper seal which again provides room for the growth of bacteria. Sometimes if there’s too much headspace, the top portion of the food becomes discolored and might develop a bad odor.
Option C as you probably guessed is the right thing to do. Don’t try to overstuff a jar, nor bother processing a jar that’s not nearly full enough. Instead, store the leftovers in a food-safe container in the fridge and consume within several days.
A bit about botulism
Clostridium botulinum is the strain of bacteria that causes botulism. Botulism, while rare is nothing to scoff at.
According to the Centers for Disease Control and Prevention (CDC), this toxin may cause severe illness, affect the nerves, cause paralysis, and in severe cases—death.
Botulism has no color and no taste and can be difficult to detect. However, even eating a small amount of food with the toxin may cause illness.
One of the main causes of botulism is botched home-canning jobs, namely jars of food that have been improperly processed.
Always inspect cans (jars) of food before eating for signs of cracks, spurting liquid, or otherwise compromised jars. Never eat food with mold on it (don’t try to scoop out the mold to salvage the rest). Throw out anything that smells, or looks bad.
Please take headspace in canning seriously!
Pop those air bubbles to get headspace just right
An easy way to get the right headspace is to ensure you release any air bubbles in freshly packed jars. During the packing process, air often gets trapped in the food.
If air bubbles don’t get released prior to processing, they tend to pop after the lid is sealed leaving you with too much headspace.
An easy way to pop air bubbles is to get a small, narrow wooden or plastic utensil (avoid anything metal as this tends to scratch the jar). An easy tool to use is a wooden chopstick.
Insert the utensil into the packed food straight down along the inside edge of the jar. Slowly move the utensil around the circumference of the jar until air is released.
It’s important to refill the jar with more food or liquid after air is released to ensure the proper headspace.
For more details, check out our post on how to remove air bubbles when canning.
There are also tools you can buy called de-bubblers, bubble removers, or bubble sticks. Some of these tools perform double duty as a canning headspace measuring tool too!
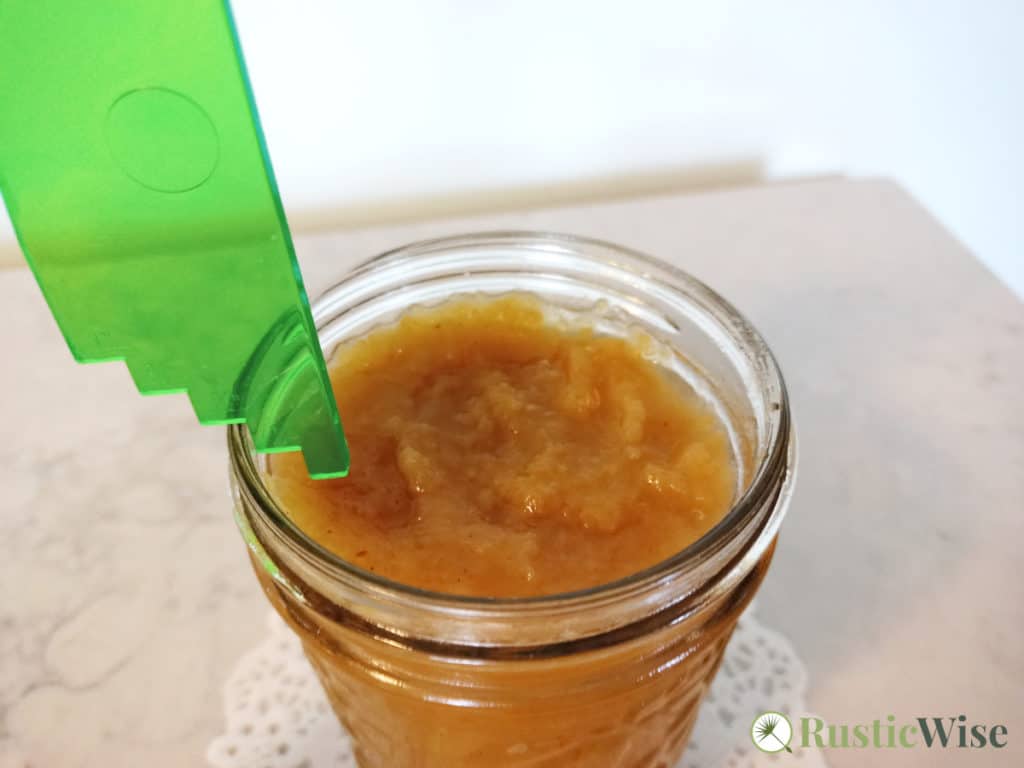
Canning headspace tool
While you can use a ruler to measure headspace, I must admit that it’s pretty handy having a canning headspace tool.
We have one of these at home. You can buy them individually, or as part of a set of other introductory canning tools (jar lifter, wide-mouth funnel, magnetic lid lifter). You’ll find them at canning stores, some hardware stores, or on Amazon.
The headspace tool has several jagged notches, each indicating a different measurement. Please don’t try to eyeball it when measuring headspace—it’s best to play it safe.
How to measure headspace in canning
To use a canning headspace tool, simply rest the correct jagged notch onto the rim of the jar. The surface of food should just touch the bottom of the tool.
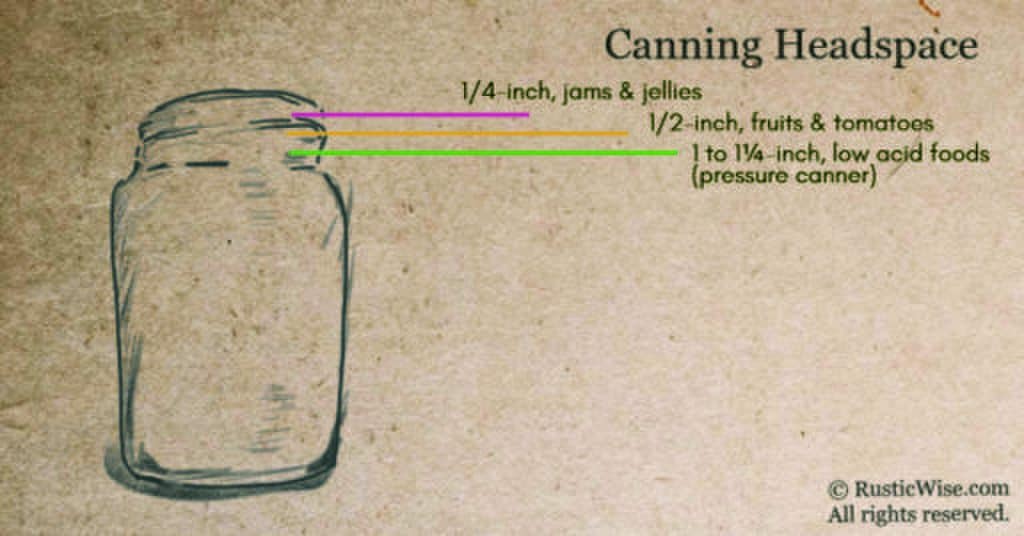
How much headspace to leave? It’s best to follow the recipe, but here are some general guidelines:
- 1/4-inch headspace for jams, jellies, relishes, syrups, and juices.
- 1/2-inch headspace for fruits and tomatoes when using the water-bath method.
- 1- to 1¼-inches for low-acid veggies, meat, poultry, and fish using a pressure canner.
A few other notes and tips
Some methods of packing tend to produce more air bubbles. Raw packing (the method of packing raw fruits or vegetables and then filling with a hot brine or syrup) is more susceptible to air pockets. (3)
Siphoning may occur when you don’t leave enough headspace. Siphoning refers to a loss of liquid either being pushed or drawn out during processing. Raw packed foods and heavy sugary syrups tend to increase the chance of siphoning. Sometimes a change in pressure can also cause siphoning. You can prevent this by letting your jars rest in the canner for 5 minutes after processing is done before removing.
Many types of cold or raw packed food shrink during processing and should therefore be packed tightly. The exception to this rule are beans, corn, peas, and potatoes which tend to expand during processing—these should be loosely packed.
Headspace for freezing food in mason jars
Why is headspace needed when freezing foods? Foods expand when frozen, so it’s also important to leave enough headspace when freezing or risk the chance of overflow (which invites in freezer burn and bacteria), or shattered glass (if using glass containers).
Is it safe to freeze food in glass jars? The National Center for Home Food Preservation (NCHFP) has some recommendations:
- It’s important to note that not all glass jars are created equal. Commercial glass jars (the type you might try to reuse from store-bought jams, for example) are thinner and more prone to breakage when frozen.
- Instead, choose mason jars that are designed for dual-purpose freezing and canning. These are made with thicker glass.
- Wide-mouth mason jars make packing and scooping out food easier too. Narrow-necked jars may break at the top if there’s insufficient headspace. This is why there’s a different guideline for headspace depending on the type of jar you’re using.
Here’s a handy chart from the National Center for Home Food Preservation detailing headspace.
Table: Headspace for Frozen Food in Pint or Quart Jars
| Type of Pack | Container with Wide Top Opening | Container with Narrow Top Opening |
|---|---|---|
| Liquid Pack (Fruit packed in juice, sugar, syrup or water; crushed or pureéd fruit.) | Pint: ½ inch Quart: 1 inch | Pint: ¾ inch Quart: 1 ½ inch |
| Dry Pack (Fruit or vegetable packed without added sugar or liquid.) | Pint: ½ inch Quart: ½ inch | Pint: ½ inch Quart: ½ inch |
| Juices | Pint: ½ inch Quart: 1 inch | Pint: 1½ inch Quart: 1½ inch |
Related questions
Is too much headspace dangerous?
If you suddenly end up with more headspace because air bubbles popped during processing, the main thing to check for is if there’s a good seal on the lid. The “button” should be pressed down, and you should be able to lift the jar by the lid without it falling off. If there’s a good seal, your food should be safe. If you’re concerned, stick it in the fridge and plan to use it right away.
On the other hand, you might come across a jar that’s been sitting in your pantry for a while with too much headspace. If the food is exposed and no longer submerged under liquid, it’s probably discolored, or may develop a bad odor. Some people may decide to just remove the discolored fruit; however, to play it safe, I would never eat anything that looks or smells bad.
How long does home-canned food last?
The general rule of thumb is that home-canned foods have a shelf life of one year. At most, you should consume canned foods within two years. This is assuming foods are properly stored (in a cool, dry place) and show no signs of leaks, cracks, or other damage. Remember to label all jars with the month, date, and contents of the jar.

Author: Josh Tesolin
Josh is co-founder of RusticWise. When he’s not tinkering in the garden, or fixing something around the house, you can find him working on a vast array of random side projects.

