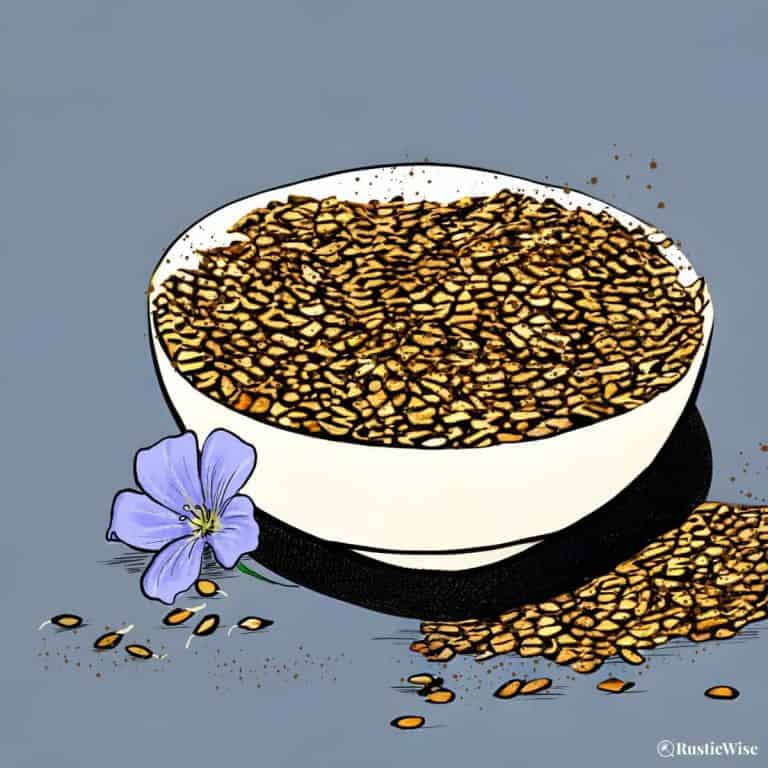
9 Tips on How To Prevent Mold on Microgreens
After putting in the time, effort, and money required to germinate seeds, it’s frustrating when you notice mold on your microgreens. This is a fairly common occurrence, so you’re not alone! Luckily, there are simple ways to prevent this from happening.
I’ve rounded up 9 simple tips on how to prevent mold on microgreens. Mold spores thrive in humid, moist, and stagnant conditions. To prevent spores from growing, some of the most important things you can do are ensure your growing medium drains well, prevent overwatering, lower humidity levels, and introduce better airflow.
This article covers the different reasons mold might grow on microgreens and what you can do to stop it. Let’s learn how to prevent mold from making a cozy home in your tray of greens.
A closer look at mold and how it grows
Mold spores are everywhere. These individual spores are so tiny that they’re not visible to the naked eye. These microorganisms are in the air we breathe; they’re also found in soil and on many surfaces.
The good news is that mold spores are generally not much of a nuisance unless you have excess moisture. Spores gravitate to areas of high moisture and humidity. Once they’ve found ideal growing conditions, they reproduce. And sometimes, they produce mycotoxins which are toxins that can be harmful to your health.¹
The takeaway: Since there’s no truly escaping mold spores, as home growers, we must create conditions that are inhospitable to these microorganisms.
Health concerns of having mold indoors
People react differently to mold—some may experience no adverse reactions, while others with allergies or asthma may have more severe symptoms.
Common symptoms of mold exposure include coughing, sneezing, eye and skin irritation, and wheezing.
Credit: Deposit Photos
Signs of mold on your microgreens
Think you might have mold issues on your microgreens at home? If you have overwatered your micros, or the growing medium isn’t draining effectively, there’s a greater chance of mold development.
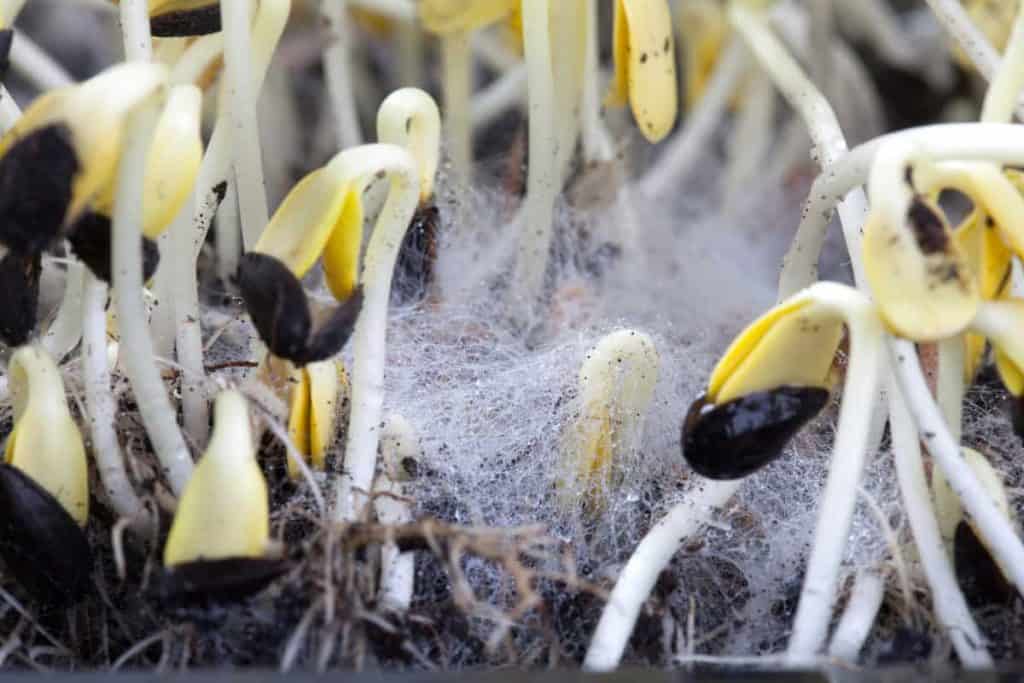
The mold spores will land onto the microgreens tray and begin growing. The initial growth of the mold is likely to be white, but with further growth, will become more brown or black. Eventually, the mold will cover the microgreens with a web-like sheath.
Here are some telltale signs of mold to look for.
- Musty odor: Sometimes, the first sign of a mold problem is an off-putting odor. Even before you see something wrong, your nose may detect a musty smell. Healthy micros should smell fresh.
- Cobweb appearance: Microgreens mold typically looks like thin, white spiderwebs which often sprawl across the soil, seed hulls, and stems. Sometimes you’ll notice tiny black specks in the cobweb-like strands. The mold webs have no noticeable pattern.
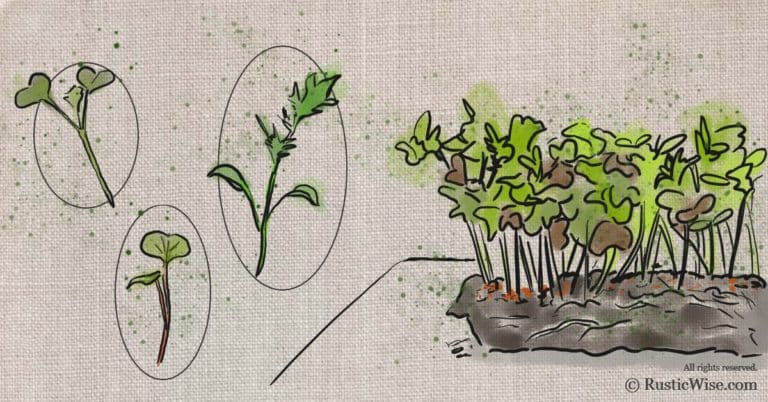
Difference between normal root hairs and mold
Even the tiniest amount of mold can spread quickly, leading to a total loss of your crop.
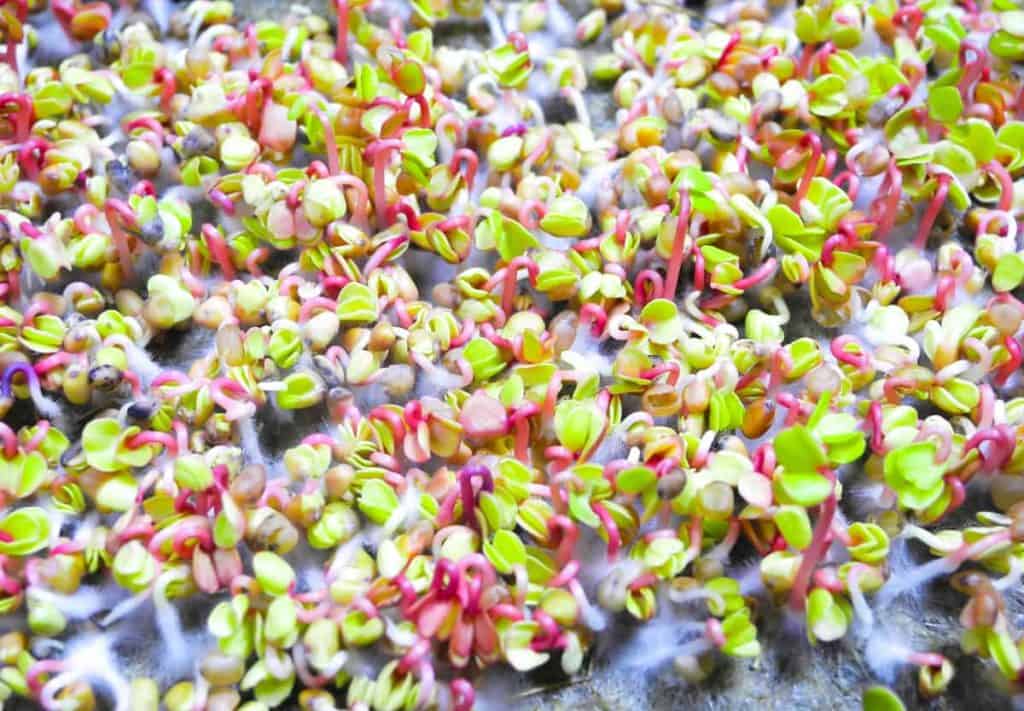
Sometimes what looks like mold at first glance is actually tiny root hairs, also known as cilia. It’s important to tell the difference between mold and root hairs.
The appearance of cilia is a normal development of many seeds, but is more prominent in some seeds than others. For example, many members of the Brassica family, including broccoli seeds, have more noticeable root hairs.
Root hairs often appear during the germination phase, typically on days 2 or 3.
These tiny hairs have several important functions:²
- Boost nutrient and water uptake.
- Increase the surface area of soil to the root.
Here’s how to tell if your tray of microgreens has healthy root hairs (and not mold):
- Growth in the same direction: Look closely at your tray of micros. Root hairs will appear to grow in one direction out of the root.
- Less prominent after watering: Go ahead and water your batch of greens. As mentioned earlier, cilia helps the young seedlings get enough water and nutrients. Typically, after drinking its fill of water, the tiny root hairs disappear or are minimized. That is, until it’s time for the next watering.
- No smell: Healthy cilia will not produce a musty or mildew-y smell like mold.
Credit: Deposit Photos
Main causes of microgreen mold
Microgreen mold is a common problem for microgreen growers. If you frequently experience mold issues on your micros, the following environmental conditions increase the likelihood of mold or fungal problems.
- High humidity and moisture buildup.
- Poor ventilation.
- Poorly draining soil, or sitting water in a microgreen tray or watering tray.
- Poorly cleaned trays between grow cycles.
- Reused growing medium.
Note: Damping off is a mold or fungal issue that can afflict many types of seedlings. It often results from overwatering. The occurrence of mold cobwebs may appear, or stems of plants grow weak and fall over.
How to prevent mold on microgreens: 9 simple tips
1. Reduce moisture and humidity levels
Microgreen mold is most often caused by the accumulation of humidity. High humidity and moisture levels are the leading cause of mold growth indoors. If you live in an especially humid climate, you may need to invest in a dehumidifier.
According to the CDC, if you’re trying to get rid of mold issues, aim to keep humidity levels as low as possible, between 30 and 50 percent. Keep in mind that levels of humidity fluctuate during the day, so you’ll need to monitor the levels more than once per day.¹
2. Avoid overwatering
It’s easy to give plants a bit too much love via overwatering. The aim is to keep the grow media moist, but not overly wet. If you regularly see pools of water accumulating on the soil’s surface, it’s a sign your soil is either not draining well, or is receiving too much watering.
The best way to prevent mold is to prevent excess water in your tray. Remember to dump out the bottom holding tray daily to prevent moisture buildup.
If you’re top watering your micros, consider switching to bottom watering. By placing your tray of micros in a basin of clean water for several minutes, you’re encouraging the root system to grow vibrant and strong. The tray will absorb water from the bottom up and the plants will drink to their fill.
3. Give seeds some breathing room
While microgreens are a densely seeded crop, sometimes things can get overcrowded. Like all living organisms, seeds need oxygen for healthy development.
When seeds are too densely sowed, or are overlapping, this can cause mold development via a lack of adequate fresh air.
The next time you’re sowing microgreen seeds, ensure seeds are spread evenly in a single layer across the growing medium.
4. Improve ventilation
Since we’re on the topic of fresh air, let’s talk about the importance of ventilation.
Poor air circulation, which creates moist conditions that are ideal for mold growth usually causes microgreen mold. When growing your microgreens indoors, ventilate your growing area well.
Sometimes opening a window for fresh air is enough when growing micros at home on a sunny windowsill.
If you’re growing microgreens during the winter, you’ll likely need to use a fan.
Improving airflow has many benefits for microgreens:
- Reduces moisture levels: Plants respire and release a lot of moisture during growth. A fan can help prevent a room from getting too humid.
- Regulates temperatures: Keep indoor temperatures at optimum levels by boosting fresh airflow.
- Stimulates nature: Outdoor plants get the added benefit of wind. We can try to mimic nature by using electrical fans. Blowing air helps to promote stronger stem development and more vigorous growth.
- Prevents fungal issues: There’s less chance of mold or fungal problems when there’s less moisture sitting on stems and leaves.
Many commercial microgreens growers have a system of oscillating fans set up to push air around a grow room.
5. Give them sunlight
Natural sunlight is a wonderful balm for many afflictions, including fungal/mold issues. Spores thrive in dark, damp surroundings. Not so much when exposed to the sun.
The UV rays from natural sunlight may inhibit the growth of spores by damaging their cellular structures. Plus, heat from the sun will dry up excess moisture—removing a key factor that contributes to the reproduction of spores.
The next time you have a sunny day, place your tray of microgreens into the sun for a good old-fashioned heat blast.
(Don’t let the sun’s rays scorch your delicate greens! Follow up with a good bottom watering session.)
6. Use a growing medium with good drainage
Whatever growing medium you choose to use, ensure it provides good drainage. Mold issues are more prevalent in micros grown in poor quality soil with poor aeration.
If your soil looks compact and heavy after watering, chances are, mold or root rot are more prone to occurring. Ensure you mix potting soil with soilless mediums such as coconut coir, perlite, or moss to improve the texture and drainage.
(And, I’m sure you already know that your microgreens tray should have drainage holes!)
7. Clean trays thoroughly between grow cycles
To prevent mold from forming, it’s important to clean and/or sanitize all tools and grow trays after each harvest.
At a bare minimum, wipe down your tray with warm water and soap after each harvest. This helps remove soils and bacteria between grow cycles. And if you deal with mold more than you’d like, it doesn’t hurt to use a solution of food-grade hydrogen peroxide to sanitize trays.
Failure to do so can cause spores or other bacteria from transferring from a diseased tray to a new batch of micros. The Pythium spp. pathogen is commonly transferred from contaminated tools to soil, or even soiled hands. This pathogen is one of the many that can lead to damping off in seedlings.³
Tip: Start with a clean tray by filling a spray bottle with undiluted 3 percent food-grade hydrogen peroxide. Spray, and let it sit for 10 minutes. Then wipe, rinse well with water, and let it air dry.
8. Don’t reuse potting soil (or other growing mediums)
While it’s tempting to get more than one use of a grow pad, coconut coir, or other potting soil, it’s just not worth the risk of root rot, or fungal spores. It’s best to simply toss it in your compost pile.
Once you’ve grown microgreens in a tray, you’ll noticed that the tiny seedlings have developed a web of tiny roots. It’s almost impossible to remove all of these miniscule roots.
If you reuse soil, the roots will soon decay and decompose, which leads to all sorts of issues in your next batch of micros.
9. Sanitize seeds
While it’s not always necessary to sanitize seeds before planting, if you keep experiencing fungal or mold issues, you might want to take this extra precaution.
Some types of seeds are more prone to dust and contaminants just because of the way they’re grown, harvested, and processed. This includes sunflower, soybean, and many other larger beans or larger-sized seeds.
You can use either solutions of food-grade hydrogen peroxide, grapeseed seed extract, or vinegar to sanitize seeds.
Can you still eat moldy microgreens?
I would advise against eating any kind of moldy produce. (Why take the risk?!) Use your judgement and err on the side of caution. Getting sick is not worth saving a few seeds from the compost bin!
But I know some of you are more adventurous out there.
If you really want to salvage your batch of microgreens that has just a teensy bit of mold:
- Remove the moldy portion.
- Rinse thoroughly in water after harvesting.
- Heat and cook before eating.
It’s definitely not safe to eat raw.
Some people also find that spraying with a solution of hydrogen peroxide or white vinegar helps to kill mold.
👉 If you like this post, see our Complete Guide to Growing Microgreens at Home. 🌱
Would you like more timeless tips via email?
Fun tips to help you live an independent, self-sustaining lifestyle. Opt-out at any time.


References
- Centers for Disease Control and Prevention (CDC), Basic Facts about Mold and Dampness, https://www.cdc.gov/mold/faqs.htm. Accessed December 2022.
- Milne Library, Vascular Plant Anatomy: Primary Growth, https://milnepublishing.geneseo.edu/botany/chapter/vascular-plant-anatomy-primary-growth/. Accessed December 2022.
- University of Minnesota Extension, How to prevent seedling damping off, https://extension.umn.edu/solve-problem/how-prevent-seedling-damping. Accessed December 2022.

Author: Josh Tesolin
Josh is co-founder of RusticWise. When he’s not tinkering in the garden, or fixing something around the house, you can find him working on a vast array of random side projects.