How To Store Bar Soap Long Term: Homemade Soap Storage Tips
If you’ve just made a large batch of homemade soap, you might be wondering how to store bar soap long term. After all your hard work and money spent on supplies, the last thing you want is for your natural soap to turn rancid. All homemade soaps last longer when stored in a cool, dry place. But besides this, there are differences in how you should store cold process soap vs. melt and pour. We’ll go over some of the best ways to store your soap to prolong shelf life and how to tell if your soap has gone bad.
Storing homemade soaps can be tricky because there are many factors at play. We’ll cover some common storage methods and give tips on how to tell if your soap has gone bad.
Why do commercial soaps last longer than most homemade soaps?
If you’re new to the world of handmade soap, it’s important to note that many types of natural products have a shorter shelf life compared to store-bought soaps. This is because most homemade bars of soap contain natural ingredients and don’t have any of the chemicals or preservatives found in store-bought brands that prolong shelf life.
In some cases with homemade soap, you may be trading longer shelf life with a more natural and nourishing bar of soap (well worth it in the opinion of many soapmakers!).
Note: It’s important to know that not all homemade soaps are created equal. Some bars of homemade soap may last much longer depending on the types and quality of oils/fats used. Simple bars of “lard and lye” soaps have a longer shelf life than soaps containing “fancier” oils.
Factors that affect the longevity of homemade soap
The type and quality of ingredients you put into your soap, how well you cure it before using, and proper storage all affect how long your soap lasts.
Allow for proper curing
This is perhaps the most important aspect of creating a long-lasting bar of soap—proper curing time. All bars of homemade soap made using cold process or hot process need to be cured.
Melt and pour soaps don’t need curing as they’ve already undergone saponification, but you should allow them to completely dry out and harden before using.
While you may hear that hot process soap is ready-to-use right away after hardening, this isn’t entirely true. While hot process soap may be safe to use after the cook time, it still benefits from a curing time of at least 1–3 weeks.
Cold process soaps require a longer curing period of between 4–6 weeks. Some makers of traditional Nabulsi soap (a pure olive oil soap from the Middle East) allow their soaps to cure for up to one year!
Why is it important to allow soap to fully cure? During curing time, excess water evaporates from soap which allows for a harder, longer-lasting bar of soap. Any excess moisture left on soap before storage shortens its shelf life. Soaps that haven’t properly cured may have less lather.
Tips: The length of the curing time affects how long your soap lasts. The longer it cures, the longer it lasts. During curing, store your soaps in a well-ventilated area allowing air to circulate freely. Keep away from heat elements and direct sunlight. Don’t allow your soaps to touch anything metallic as this may cause dreaded orange spots (DOS).
Types of oils used
Just as not all homemade soap is created equal, nor are all types of soapmaking oils. Yes, even soapmaking oils have a shelf life. If you use an old bottle of sunflower oil that has sat on your shelf for the past two years, that oil (and soap) will have a shorter life than if you use fresh sunflower oil.
We could dedicate whole articles on this topic, but I’ll just mention that different oils for soapmaking have varying shelf life. The Handcrafted Soap & Cosmetic Guild (HSCG) lists a few common oils and their shelf life:
- Three months or less: Hazelnut oil, hempseed oil, and grapeseed oil.
- Between six months to one year: Apricot kernel oil, evening primrose oil, flax seed oil, sesame oil, sweet almond oil, and wheatgerm oil.
- One year: Avocado oil, castor oil. coconut oil, emu oil, palm oil, palm kernel oil, safflower oil, and shea butter.
- Two years: Canola oil, olive oil, and tamanu oil.
- Three years: Properly frozen emu oil, meadowfoam oil, beeswax, jojoba oil, and fractionated coconut oil.
Fragrances
If you made scented soap, the scents may wear off in a matter of months. Some types of fragrance oils may last longer than essential oils, but this really isn’t an exact science. While the scents may fade, the soap is still perfectly fine to use. To prevent scents from fading, store in an enclosed box such as a shoebox.
Proper storage
Ideally soap should be stored in a cool, dry place away from direct sunlight. High humidity could contribute to a shorter shelf life.
How to store cold process and hot process soap
Air circulation is the key to keeping both cold and hot process soap bars happy. When sealed tightly, the bars of soap don’t have enough “breathing space.” Any moisture released from the bars over time become trapped any may contribute to oxidation and DOS.
Even after bars of soap have cured for several weeks, they continue to release any excess water into the environment which is why you shouldn’t seal them in any way.
Tip: Avoid wrapping or placing your soap on anything metallic (including wire shelving). Metal may cause soap to oxidize. Keep soap in a cool, dry, dark place away from direct heat or sunlight. Avoid storing in rooms with temperature fluctuations such as a garage.
Here’s a few ideas how to store bar soap for long term (cold and hot process soap):
- Open shelf: Many people keep their fully cured soap on open racks. Coated stainless steel wire racks (which prevent oxidation) are ideal as they allow plenty of air movement. Even a bookshelf works fine too. If you’re worried about dust, you could place a light mesh fabric such as cheesecloth over the soap.
- Shoe box: Sometimes the simplest methods work best. Store soap in an uncovered shoe box. If you prefer to put a lid on the shoe box, either loosely cover with the lid, or poke a few air holes.
- Cardboard box with cling wrap: Over at Vermont Soap, they recommend naked bars of natural soap in a cardboard box and then taping a piece of cling wrap over the top. They also suggest freezing individually wrapped bars of soap in plastic wrap for long term storage. I’ve never personally tried this so can’t attest to this method.
- Cardboard flats: You know the large flats you can get at Costco? These work great for keeping your soap organized.
- Plastic box: Unsealed plastic boxes work fine too. Again, if you wish to put the lid on, ensure there’s a few holes for ventilation. Some people on several forums have mentioned using Rubbermaid boxes—if you have these on hand, they’ll work fine, but any brand will do!
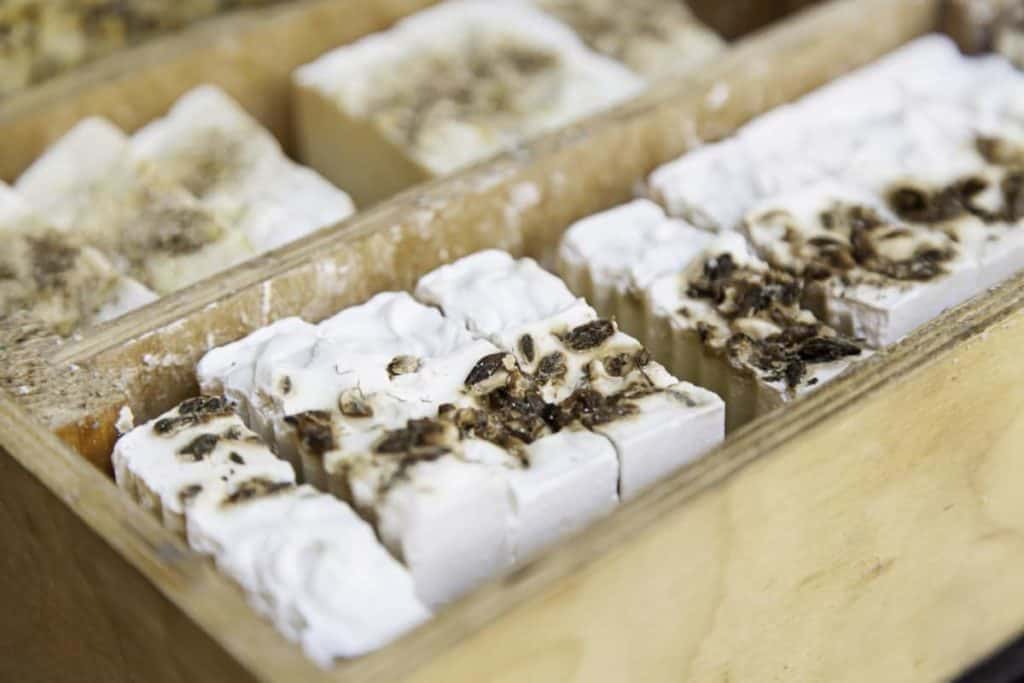
- Wooden boxes or crates: Use any wooden box to store soaps provided it has air circulation.
Other storage tips
- If you don’t have enough room for laying all of your soaps in one layer you can stack them. Try staggering them on the bottom layer by leaving several inches of space between each bar. Place the second layer so that the soap covers the gaps beneath. Repeat as needed. This way each layer of soap still gets some air circulation.
- Store similar scented soaps together in a cardboard box with a lid. Keep in mind that fragrances will mingle, so store scents that you want to smell together.
- Rotate your homemade soap just as you would pantry foods to ensure older ones are used first.
- Just as you label the dates of home canned foods or frozen food, make sure you also label your soap with the date you made the soap.
- If you’re worried about dust, you can try loosely placing a piece of sheer fabric or cheesecloth over the tops of storage boxes. Just try to make sure the fabric isn’t touching the soap.
Wrapping soap
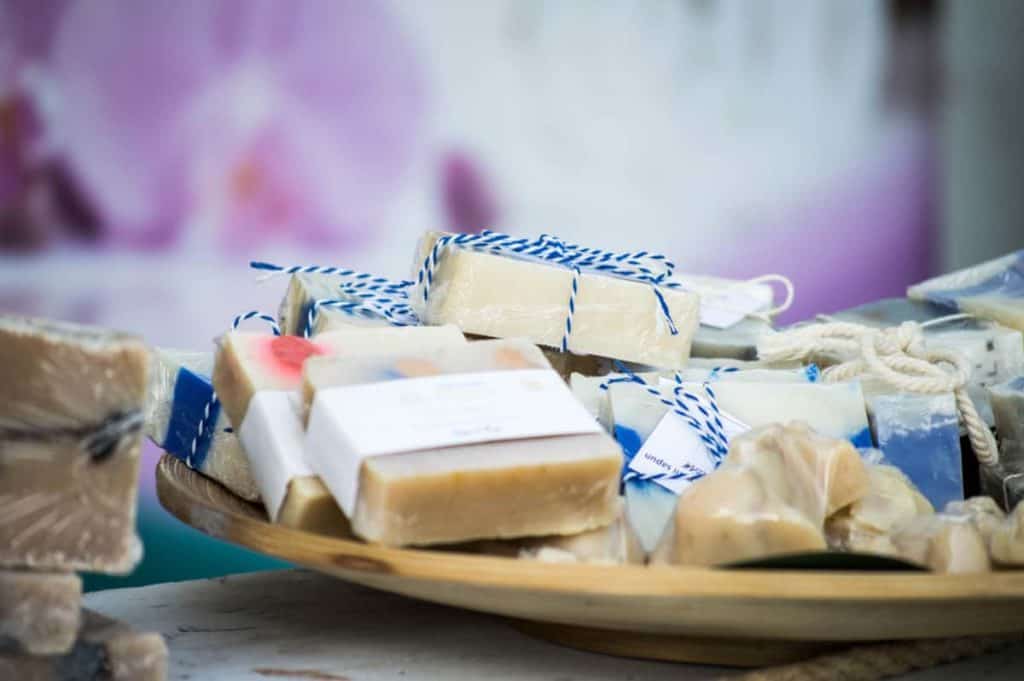
If you’re planning on giving soap as gifts or selling your soap, it’s best to wrap it just before selling to allow for as much air circulation as possible. Here’s a few common ways to wrap cold or hot process soap:
- Wax paper (sealed with a sticker)
- Tissue paper (avoid touching colored or patterned tissue paper onto soap as the colors will transfer)
- Cigar bands (or belly bands)
- Cloth
- Cloth pouch or bag
- Coffee filter
How to store bar soap long term: melt and pour
Melt and pour soap bars are a different beast than soaps made using cold process or hot process. Melt and pour soaps should be wrapped once fully hardened to prevent “sweating.”
Many melt and pour soap bases contain lots of glycerin which is a natural humectant. Humectants work by absorbing or attracting moisture in the air. What appears on many melt and pour soaps are tiny beads of moisture which some people refer to as the soap sweats.
What should you wrap melt and pour soap in? An airtight box.
If you’re so inclined, you can individually wrap each bar with plastic wrap and using a heat gun to shrink wrap. But, we know there are lots of people who frown upon plastic…
Stephenson Personal Care (a supplier of soap and cosmetic ingredients) has a few tips to prevent melt and pour soap from sweating:
- Place silica beads in an airtight plastic container along with soap. The silica beads help to draw out any excess moisture. Allow soap to sit in the container for up to 2 hours while checking on it ever half-hour. Don’t leave the silica beads in for longer than this or risk drying out your soap. Store the MP soap in an airtight plastic container.
- Run a fan over unmolded soap.
- Use a dehumidifier in areas with high humidity.
Shelf life of homemade soap
As we mentioned, the way soap is stored and the ingredients used in the soap greatly affects its longevity. There’s no hard and fast rule as to the shelf life of homemade soap, but here are some general guidelines:
- Soaps made of oils with a short shelf life (think grapeseed or hempseed oil): Use within 3–6 months. These types of oils spoil quickly and soap may turn rancid.
- Soaps with fragrance: many soaps scented with essential oil may lose its aroma within 3–6 months, however the soap should still be good to use.
- Average bar of homemade soap: Many natural homemade bars of soap should be good for up to 3 years.
- Old-fashioned soap made using just lye and lard: These simple bars of soap may last 5 years or more.
How to tell if homemade soap has gone bad
A common occurrence on homemade bars of soap are those dreaded orange spots. Luckily, DOS doesn’t affect the usability of your soap, just the looks.
You can either cut off the orange bits, or use as it. However, if the DOS is accompanied by a rancid smell or a sticky film, it’s time to toss it!
Read up on what causes dreaded orange spots here.
How to store soap after use
Now that you know how to store bar soap long term, how do you store soap after each time you use it in the shower, or just to wash your hands?
- If you have a soap dish, use it! In particular a soap dish with drainage is best as it prevents water from turning your soap mushy.
- Use a washcloth to wipe off excess moisture if it’s very wet after a shower.
- Allow your soap bar to dry out completely between uses if possible.
- When your soap bar becomes too small to use, don’t throw it out! Store soap slivers in a small cloth pouch and use it as a DIY loofah.
Related questions
Is it okay to use expired bar soap?
Some store-bought soaps may have a manufactured date stamped on the package. According to Dove, you should store their soap products at room temperature and use within 3 years from the date of manufacture.
Soaps that are older than this should still be safe to use; however they may not lather as well, or may have lost its fragrance. Older soaps may also be more crumbly.
In the case of natural homemade soap, there really isn’t an expiry date. Just trust your common sense and toss anything that smells rancid, or has developed a sticky film.
Is bar soap less sanitary than liquid soap?
Both bar soap and liquid soap have been found to be equally effective at reducing the level of microbes on our skin (so long as you scrub for at least 20 seconds). They both contain surfactants which help loosen oil, dirt, and microbes on the surface of our skin.
Many people prefer using liquid over bar soap because of the fear of germ transfer. Studies show that there is little to no transfer of germs from a bar of soap to hands when washing. So whatever you choose to use, scrub away!
Check out our DIY antibacterial liquid soap recipe here.
If bar soap is more your style, check out 3 ways to make kitchen bar soap.

References:
- Handcrafted Soap & Cosmetic Guild (HSCG), The Shelf Life of Oils, https://www.soapguild.org/how-to/ingredients/shelf-life-of-oils.php. Accessed May 2021.
- Vermont Soap, How long do natural bar soaps last in storage?, https://vermontsoap.com/long-natural-bar-soaps-last-storage/. Accessed May 2021.
- Stephenson Personal Care, Soap Sweating & How to Fix It, https://www.stephensonpersonalcare.com/blog/2018-02-27-soap-sweating-how-to-fix-it. Accessed May 2021.
- Dove, Frequently Asked Questions, https://www.dove.com/uk/secure/contactus/faq.html. Accessed May 2021.
- Sconce Massaquoi, Michelle (14 July 2020). “Is bar soap as gross as millennials say? Not really, and we’re all covered with microbes anyway,” The Conversation. Accessed May 2021.

Author: Josh Tesolin
Josh is co-founder of RusticWise. When he’s not tinkering in the garden, or fixing something around the house, you can find him working on a vast array of random side projects.